The "Hello World" of Tone.js - Pt.2

Introduction
Tone.js is a powerful library for creating interactive music and sound experiences in the browser. One of the best ways to get started with Tone.js is by exploring its various synths, which allow you to create a wide range of sounds and melodies.
Check out the "Instrument" section in the docs to see some of the synth types that Tone.js has to offer like AMSynth, DuoSynth, FMSynth, and so on. There’s a lot to explore and discover!
The Simplest Synth: "Synth"
One of the simplest synths in Tone.js is the aptly named "Synth" instrument, which is composed of an oscillator routed through an amplitude envelope.
The oscillator is what generates the sound and the amplitude envelope we can say “shapes” the sound.


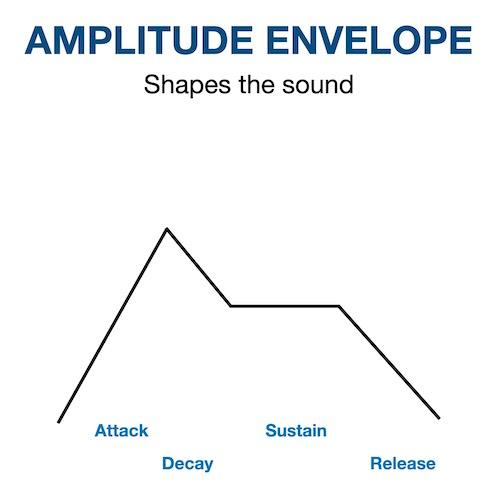
An envelope in Tone.js can be likened to a sculptor who shapes clay.
Just as a sculptor uses their hands and tools to shape a piece of clay into a specific form, an envelope shapes the sound wave generated by an oscillator into a specific shape or contour.
If you’re familiar with the underlying Web Audio API, you’ll know that you can build these types of synths by individually piecing the building blocks together.
But...you have to do it piece by piece, creating instances of the various nodes and connecting them together.
The synths in Tone.js, however, assemble these building blocks together for us. This makes it a lot easier to start getting useable and more complex sounds!
Creating a Synth Instance
To create an instance of the "Synth" instrument and connect it to your speaker outputs, you can use the following code:
const synth = new Tone.Synth().toDestination();
In this code, we've created an instance of Tone.Synth and called the toDestination method on it.
toDestination routes the audio output of the synth to our speakers.
But...this synth isn't gonna play itself! We’ll need a way to actually play or trigger a note. There are various ways we can do this.
For example, we could set up our computer keyboard to allow us to play the notes. Or, we could set up an actual MIDI keyboard and trigger the notes via MIDI.
But, for this article, we’ll trigger the notes programatically.
And we can do that using a method called triggerAttackRelease.
This method takes two arguments:
- the name of the note along with its octave
- the duration of the note.
Here's an example that plays a C4 note for an 8th note:
synth.triggerAttackRelease("C4", "8n");
As another example, if we wanted to play that note one octave lower and have it held for a half-note duration, we could write:
synth.triggerAttackRelease("C3", "2n");
Getting the Audio Context Running
Before you can hear any sound though, there's an extra step you need to take. 😲
Due to the Autoplay policy implemented by browsers, websites are not allowed to start playing sounds automatically when a user visits the page, as this can create a bad user experience. Instead, the user must interact with the page in some way to start the audio. (It’s sorta like they need to provide consent for the audio to play).
By default, the audio context for a page is in a suspended state. What we need to do, in response to a user interaction, is to change the suspended state to a running state.
You can do this by adding an event listener to a button or other user interface element, and then calling Tone.start() in the event handler callback function.
Here's an example that sets up a "Play" button to start the audio:
The HTML
<button id="play-btn">PLAY</button>
The JavaScript
document.getElementById("play-btn").addEventListener("click", () => {
  if (Tone.context.state !== "running") {
    Tone.start();
  }
  synth.triggerAttackRelease("C4", "4n");
});
Note that if you try to call Tone.start() without a user interaction, it will be blocked by the browser, and you'll see an error message in the console.
Where To Go From Here
Once you have the basics of creating and triggering synths in Tone.js, you can start exploring the library's more advanced features, such as effects, sequencing, and scheduling.
The Tone.js documentation is a great resource for learning about these features, and there are also many examples and tutorials available online.
In conclusion, Tone.js is a fantastic library for creating music and sound in the browser, and its synths provide a great starting point for learning how to use it.
By following the steps outlined in this blog post, you can get up and running with Tone.js in no time and start creating your own interactive sound experiences.
If you're more of a visual learner, check out the video version of this article: