GSAP ScrollTrigger | Getting Started
Introduction
In this article, we'll learn the basics of using the ScrollTrigger plug-in from GreenSock(aka GSAP or the GreenSock Animation Platform). ScrollTrigger allows us to create awesome scroll-based animations and is a powerful tool in scrollytelling. Unlike traditional animations, which might start when the page loads, scroll-based animations trigger based on the user's scroll position in the viewport.
Installing ScrollTrigger
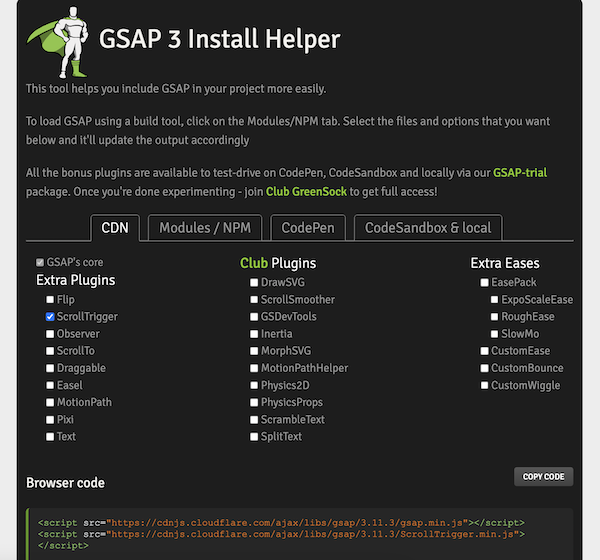
You can find the Install Helper for ScrollTrigger on GreenSock's website. To get a quick start, choose the CDN option and make sure that ScrollTrigger is checked in the Extra Plugins column.
GSAP is the core library and ScrollTrigger is the specific plugin we use to trigger animations with the scroll bar. We'll need both for our code to work.
In the Browser code section below, select COPY CODE to copy the script tags to your clipboard.
Create a basic HTML file and paste these script tags before the closing body tag. Let's also create an additional script tag for our own app.js file. (This is where we'll write our ScrollTrigger code).
Now, create a style.css file and link to it in the head of the HTML document.
<!DOCTYPE html>
<html lang="en">
  <head>
    <meta charset="UTF-8" />
    <meta http-equiv="X-UA-Compatible" content="IE=edge" />
    <meta name="viewport" content="width=device-width, initial-scale=1.0" />
    <title>Document</title>
    <link rel="stylesheet" href="style.css" />
  </head>
  <body>
    <script src="https://cdnjs.cloudflare.com/ajax/libs/
gsap/3.11.3/gsap.min.js"></script>
    <script src="https://cdnjs.cloudflare.com/ajax/libs/
gsap/3.11.3/ScrollTrigger.min.js"></script>
    <script src="app.js"></script>
  </body>
</html>
Creating HTML Elements
Let's start setting up some basic HTML elements.
Create two divs and give them a class of div1 and div2. Inside the second div, create another div and give it a class of square.
<body>
  <div class="div1"></div>
  <div class="div2">
    <div class="square"></div>
  </div>
</body>
Setting Up the CSS
We'll need to style this a bit before we can see anything on the page.
Create a rule for the body and zero out the margins. (This will prevent any browse default margin styling getting in our way).
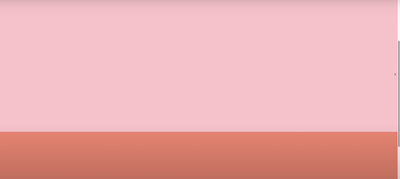
Next, give div1 and div2 a height of 100vh. And, to distinguish them, we'll give each a different background color. ("pink" for div1 and "salmon" for div2).
body {
  margin: 0;
}

.div1,
.div2 {
  height: 100vh;
}

.div1 {
  background-color: pink;
}
.div2 {
  background-color: salmon;
}
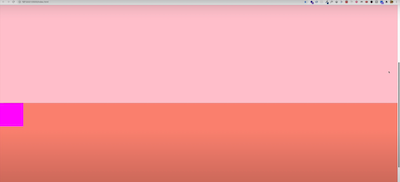
In the browser, we can see div1(pink) taking up the entire height of the viewport. However, when we scroll down, we see div2(salmon) enter the viewport.
Styling the Square Div
Now that we have the main divs set up, let's add some styling to that div with the class of square. (This is the element we'll be animating).
In our CSS, let's give it a width and height of 150 pixels and a background color of "fuchsia".
body {
  margin: 0;
}

.div1,
.div2 {
  height: 100vh;
}

.div1 {
  background-color: pink;
}
.div2 {
  background-color: salmon;
}
.square {
  width: 150px;
  height: 150px;
  background-color: fuchsia;
}
Now, in the browser, if we scroll down, we see that fuchsia square on the left side of the viewport.
Animating the Square Div
Let's move into our app.js file now and start writing some GSAP code.
First, we'll create a basic tween(animation) using a method called to.
This method takes two arguments:
- the target element to animate
- a vars object
The vars object contains properties we want to animate as well as special properties like duration, delay, etc.
gsap.to(".square", {});
Let's animate our square from the left to right.
Normally, we can do that via CSS using the translateX function. But GSAP gives us the x shorthand. We can assign x the number of pixels we want the element to move. We'll use the number 700. (Notice that pixels is inferred).
gsap.to(".square", {
  x: 700,
});
Let's also set an animation duration of 3 seconds.
gsap.to(".square", {
  x: 700,
  duration: 3,
});
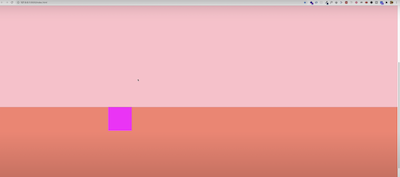
Now, if we refresh the page and scroll down, you'll see that the square has already moved 700 pixels to the right. This is because the animation is being triggered on page load. We haven't implemented ScrollTrigger yet.
Registering ScrollTrigger
Let's remedy that though and bring ScrollTrigger into the mix.
First, let's register the plugin.
For this, GSAP provides a method called registerPlugin. We'll pass ScrollTrigger into this method as an argument.
According to the documentation, the registerPlugin method ensures that the GSAP core library and the ScrollTrigger plugin work together seamlessly.
gsap.registerPlugin(ScrollTrigger);
gsap.to(".square", {
  x: 700,
  duration: 3,
});
Adding ScrollTrigger
In the vars object, let's define a property called scrollTrigger(notice that the "s" is lowercase). We'll set its value to be the div with the class of square because we want this div to trigger the animation. This trigger element will fire once it has entered the viewport.
gsap.registerPlugin(ScrollTrigger);

gsap.to(".square", {
  x: 700,
  duration: 3,
  scrollTrigger: ".square",
});
Now, when we scroll down, we should see the square div animate once it's entered the viewport.

Using a Different Element as the Trigger
Let's learn how we can use an element, other than the target, as the trigger.
In our HTML, underneath the div with a class of square, let's create another div. We'll give it a class of square2.
<body>
  <div class="div1"></div>
  <div class="div2">
    <div class="square"></div>
    <div class="square2"></div>
  </div>
</body>
Then, in our CSS file, let's create a rule for square2 and give it a background-color of blue. This will help distinguish it from the fuchsia square.
Let's also give it a margin-top ot 300 pixels. This will position it lower than the first square and help us see how to use it as a trigger element. Remember, we want the first square to start animating once the second square enters the viewport.
body {
  margin: 0;
}

.div1,
.div2 {
  height: 100vh;
}

.div1 {
  background-color: pink;
}
.div2 {
  background-color: salmon;
}
.square {
  width: 150px;
  height: 150px;
  background-color: fuchsia;
}
.square2 {
  margin-top: 300px;
  width: 150px;
  height: 150px;
  background-color: blue;
}
In app.js, instead of assigning the scrollTrigger property a value of square, we'll assign it to square2.
gsap.registerPlugin(ScrollTrigger);

gsap.to(".square", {
  x: 700,
  duration: 3,
  scrollTrigger: ".square2",
});
Now, the animation will no longer start when the fuchsia square enters the viewport. The fuchsia square's animation will be triggered only when the blue square enters the viewport.
If you're more of a visual learner, check out the video version of this article: